Sunday, 26 August 2012

Cane Chair Restoration

  C a n e    C h a i r    R e s t o r a t i o n  

My projects teach me something - read my "Teach Me A Lesson" at bottom of page
Whilst driving, I instinctively always visually sweep the streets for goodies that might want to come my way, so, one day, whilst driving my teenage son somewhere I spied this chair, it was sitting along with other roadside rubbish at a house 4 houses down from our own and as I adore cane furniture and anything lattice I did a quick, calculated and efficient retrieval of said piece, my son was, of course, embarrassed beyond description but no one was going to stop me.  I couldn't afford being spotted by friends or neighbours so inspecting the chair prior to picking it up was not an option, luckily, it's bones were in great shape.
The seat is made up of a piece of plywood specifically cut to the shape of the chair, recuting it myself was impossible and the hardware only cuts straight lines, my other option was hubby who's a cabinetmaker but I know I can't hold my breath waiting for him to do anything for me, so salvaging the plywood was the only way.  I hand sanded the plywood to smooth it and then disinfected it well and left to dry.  The cushion insert is thinner towards the edges and raises gradually towards the middle, recuting a brand new one costed $50, so, to save money, I soaked it in bleach with hot water twice, then washed and left it to dry, took days to dry but there was no musty smell left or anything.  As the chair looked like it had seen some wet days, I disinfected it and hosed it and left it to dry.  Once dry, I sprayed it with an oil based undercoat costing $4 a can and then went over it with an oil based grey paint which I purchased on clearance for $2.  I recovered the seat with a new fabric costing me about $4 and reattached the seating.  The chair restoration was such a simple job and so effective.
 Teach me a Lesson....My cane chair restoration taught me that when I can't replace something that's beyond my capabilities, or if it's ineffective costwise, that a little imagination and elbow grease can  achieve a fantastic end result and who's to now?  Lesson Learn!!!
 So, what do you think?  Do you like it as much as I do?     :^) Lara

Monday, 6 August 2012

An old lamp is new again...Groovy Retro Lamp Refurbishment

An old lamp is new again ....  Funky Retro Lamp Refurbishment

My projects teach me something - read my "Teach Me A Lesson" at bottom of page
                                               
Found - one Funky Retro 1960s/1970s lamp
Where - op shop/charity store
Cost - $6
Desirability - Love the design, Hate the colour, Love the price tag

Steps to a new lamp : 
Equipment used - masking tape, fine sandpaper, soapy water, vinegar, dry cloth, oil based colour spray paint cans, super high gloss oil based clear spray can

Tested electricals, no problems there at all.

Taped up all the areas that were meant to remain paint free.

Gave Lamp light sanding, hard to do given the high gloss baked on glaze and it's shape.

After sanding, cleaned lamp with soapy water with a drop of vinegar, ensure it's dry.

Spray painted a white base coat.

Spray painted in a high gloss jet black, applied light coats in sweeping motion to avoid drips, allow to dry between coats.

Left to admire lamp for a few days in all it's black glory, didn't love it.

Decided a high gloss cherry red might be right.  Silly me, I should have undercoated over the black, reason being, Cherry Red took many many coats to reach the right shade due to the black colour, it started off really dark and dull, I ended up using two whole cans of Cherry Red to get it to the right shade, finally got there.

YES!  Cherry Red, LOVE it!.

Finally, although the Cherry Red was high gloss,  I decided to give it two coast with a super high gloss clear for more shine, didn't really change very much.

Time for a shade.  Found - dark navy blue lamp shade on clearance at Target for $9, WooHoo!

My 'New' Lamp, it looks so tiny here but it's a really good size.  It sits atop a 1960s/1970s cane console table, which was a recent ebay purchase and refurbishment, but that's another story which I will post another time.
Teach me a Lesson.......My Restoration projects are teaching me things.  This funky retro lamp has taught me that if I'm not happy with the colour I've just painted, that I should undercoat over it before I go onto the next colour, saves money and time.  Lesson Learnt!!!

More restorations to come.
 Hope you are enjoying my little projects     :^) Lara

Sunday, 5 August 2012

Unique ?1950s?1960s1970s?    Monstera Leaf Retro Lamp Makeover

My projects teach me something - read the "Teach Me A Lesson" at bottom of page.

Above 2 photos - photos of lamp both taken under different light
Above - After some delicate and light sanding - sanding harshly would have damaged the surface...
Above - In it's original state, already started some sanding when I decided to take a photo...
Above - First attempt at colour, light green-blue that turned out more icy light blue......
Above - the ivory brought out it's delicate features, but too boring for me ....
Above - Uggg, I need sunglasses, this yellow was super stark, love the colour not for this item.....

This lamp and I eyed each other curiously in a charity store for about 2 weeks, wasn't sure whether I wanted to pay the high price on it, this store has become so overpriced, it's beyond ridiculous, often equal or more expensive than new retail store prices.  So, I examined this lamp about 10 times over a 2 week period, so unsure, until one day, I cracked and had to have it.  Thinking that if it was gone, then it wasn't meant to be, but there it was, waiting for me, so like a scene from mission impossible I dodged the 5-6 bystanders, clothing racks and goods for sale that were in my way, as I was approaching and at the precise time and distance, I extended my arm out and in my mind I was like the mother in the incredibles movie and swiped it off the shelf, my swift and rapid motions caused bystanders to turn to see what had just happened, and there I was holding it and smiling with joy like a little kid, And The Beautiful Union Was Made!  It was meant to be!

I believe my Little Monstera is from the 50s/60s/70s, I'm really clueless to it's era; the electricals, which still work, are really really old and appear to be original, I would like to replace them for safety.  The lamp is made of some type of plaster, somewhat delicate and dusty like plaster of paris, it is not a baked ceramic glazed lamp, I like to imagine that it was hand made but I really know nothing about it, it has a very fine hairline fracture like you might find in the baking process so it may have been baked but I so don't know, I'm so clueless, again.  The underside told me it had originally been a cream colour, then mission brown, then cream again.  So now it's mine but what colour?

For the restoration ...

Firstly.... cleaned it with vinegar to get off dirt and grime, allowed to dry.

Following .....gave it a light sanding, had to be gentle due to the delicate nature of the plaster.

Then, next step.... re-cleaned it to remove dust from sanding, allowed to dry.

Then, afer that.....Brushed on a water based undercoat in white.

Then, for the painting.....Brushed on a water based wall paint in a light greeny-blue, turned out a matt icy light blue, not happy.

Then, to undercoat, again....Took my chances and overcoated in white oil based, no problems, it worked well. 

Then, for some more painting.....Spray painted oil based Ivory colour, brought out it's delicate features but too boring for me.

Then, for a little more painting.....Thought a yellow would be nice, sprayed oil based yellow which was like a stark banana yellow, overpowering and ugly.  Terrible!

Then, how about even some more painting.......Decided a baby lemon yellow - couldn't find such a shade so I found a Lemon Yellow spray can, true to it's name, it's like lemon off the tree yellow, but I'm happy and it has grown on me beautifully.

Then, for the final finishing touch......The spray can was meant to be high gloss but not as high gloss as I expected, so I applied 3 coats of a super high gloss clear, still not very glossy but it's better.  And the transformation is finished.  Found a clearance dark navy blue lamp shade at Target for $9, same lamp shade that's on my other lamp transformation.

Tip!  Always apply spray cans at the recommended distance and in a gentle moving motion to prevent drips and overload, apply light coats to aim for a layered build up and allow to dry between each coat.

My Little Monstera Lamp will be with me forever, it's so unique.  I know now that a little paint can do so much.

Teach me a Lesson.......I'm finding that with each restoration I learn a lesson, this one taught me to act fast, don't hesitate and wonder about possible purchase regrets, AND, so importantly, to be more decisive with colour choices, perhaps a little test patch would be better on the hip pocket than wasting entire cans and then decide I don't like it.  Lesson Learnt!!!
                         So, what do you think????? 
Does anyone have any information on this type of lamp?????   Any information is greatly appreciated.
                                    :^)  Lara

Saturday, 4 August 2012

A Little Campaigning Goes a Long Way


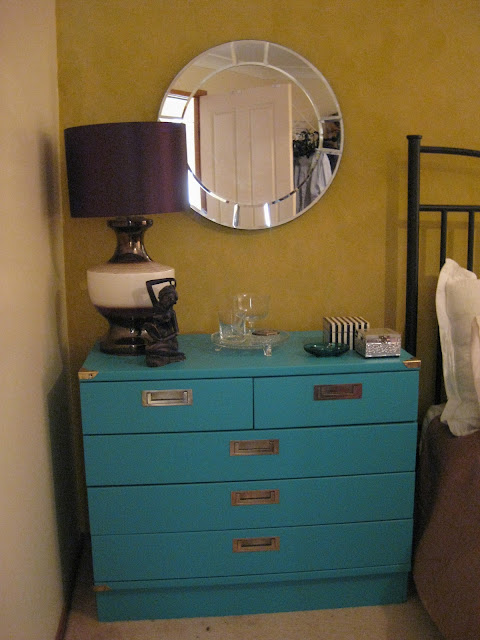
Campaign chest of drawers restoration.....
.....from brown, old, dirty and boring    to   new, fresh, Teal and newly loved.
My projects teach me something - read the "Teach Me A Lesson" at bottom of page.
A little about myself ...... due to lack of finances over the years, I have developed a love for second hand items, whether they are road side treasures or charity store finds.  I must say that I have made some big mistakes and have been blinded by the pretty picture in my head and the thrill of finding a free or cheap treasure that I have failed to inspect items properly and often, the items have ended up in my own trash, but it's all so much fun.

Well, this item was picked up at an op shop/charity store, I had my mind on a campaign piece so my excitement overrode my sensibility and I didn't inspect it properly and just bought it.  I had a white bedroom suite in campaign style which I had chosen myself as a little girl and I loved it so much.

The restoration took 2 days, should have taken longer but I am notoriously impatient.  This piece was clearly very unloved for a very long time, it looked like it had possibly been out in the elements and had a little bit of water damage to the bottom sides near the back, it had heaps of mouse droppings internally so I carefully and thoroughly disinfected it and cleaned it up.  There were scratches and damage on this piece, most of which disappeared with good sanding with hubby's electric sander & coarse paint removing sandpaper, followed by smoothing sandpaper afterwards, then damp dusted with soapy water and left to dry.  Paint was done with 4 coats of Taubmans Teal Flash, while wet it was bright aqua, shock/horror, but dried to a medium teal, thank goodness.  I used 2 sample pots, costing $14 and I still have 3/4 of one pot left over.  I scrubbed the brassware with steelo wool which sent my allergies crazy even with a face mask on.  There is one brass corner missing on the bottom right hand side and I hope I can find one to fit one day.  All brassware is tacked in and was removed by gently prying a thin object to lift the brass without too much damage as it's very weak and pliable.  Polished brassware with Brasso, retacked and and job finished.

The chest is now my bedside table, I had a standard small bedside table there and I LOVE this so much more, I added an art deco look mirror, the vintage lamp and some of the decorations just don't go but will stay until I find what I'm looking for.  Hubby is going crazy with each new piece I drag home, he huffs and puffs and says lots of OMGs but I am who I am and he just has to deal with it, LOL!


Teach me a Lesson.......I'm finding that with each restoration I learn a lesson, this one taught me to not dive head first and blindly into picking up a piece of second hand furniture, I need to take the time to inspect it well, I've ended up having to throw pieces out too many pieces myself as they are beyond my expertise in what I can do to repair them.  Lesson Learnt!!!

                                         Hope you enjoyed my post.
                            Feel free to leave me a message   :^)  Lara